StarlinkLeader
-
Posts
310 -
Joined
-
Last visited
-
Days Won
28
Everything posted by StarlinkLeader
-

starlink wifi router
StarlinkLeader replied to srexler's topic in Starlink Troubleshooting & Questions
Try and get a WiFi mesh Access point and plug it into ethernet via adapter if required. You will have much greater success with mesh access points as you can roam between them and not reconnect etc. Ubiquiti, google mesh, TP link and other brands offer a range of mesh extenders. Check out the Starlink shop for mesh WiFi access points via your starlink app. -
Need solution to shed 300ft away
StarlinkLeader replied to Jeff's topic in Starlink Troubleshooting & Questions
Hi @Jeff Ubiquiti Point to point links. You put one on the house ( outside ), one on the shed. Both facing each other. The one in the shed, plugs into an Access point - Which then provides 2.4ghz, 5ghz WiFi. Your starlink will plugin via ethernet ( may require adapter ) into the ethernet of the ubiquiti link on the house end. Both ubnt ( ubiquiti ) point to point links use PoE, but only 24v PoE. They commonly include the PoE ethernet power adapter. Check out this video from crosstalk solutions - He also has a few other videos on PtP setup. Simple diagram of PtP Starlink Router Ethernet -> PoE adapter, ethernet port -> UBNT PtP house -> UBNT PtP Radio shed -> PoE adapter -> ethernet into access point. Its a wireless bridge, most are capable of 500mbps. Won't be effected by rain etc at small distance. You also won't need a big unit for the distance your doing. If you have any queries feel free to reach out. -
It has an option to use the camera function, during use of the app it may request use of the camera.
-
The mailservers remain the same. Check out this post:
-
New install - “No Internet Connection”
StarlinkLeader replied to CGA82's topic in Starlink Troubleshooting & Questions
I would definitely check wiring - Starlink has special wiring and isn't typical. -
Always red light on my router.
StarlinkLeader replied to Wester's topic in Starlink Troubleshooting & Questions
Glad to hear its all sorted! 🙂 -
Hi @Roger Duffell What region are you located in?
-
Yes, WiFi will still function whilst the ethernet adapter is plugged in. Just ensure you run a different WiFi name on the other access point. You should only need to run an access point, not another router ( simplicity is key )
-
Hi Dave In all honesty from a neutral standpoint I wouldn't be using starlink as a primary tool just yet in your internet toolbox for your van. I would consider a peplink transit router which has two modems, and some of the transit models have 5G modems. Heres how peplink works: 2x LTE Modems -> Running two different networks -> Piped into one connection. You can then add starlink in, at a later point - Plug it in via ethernet to peplink ( with some extra configuration required ) then you prioritize starlink traffic over the other modems. - You then get the best of both worlds: Peplink, nearly full 3g,4g,5g any where you go - Then when you are at a campsite etc, turn on your starlink and your not using up all your mobile data. - Once starlink has more satellites, and you require extra bandwidth at times - Then go for the starlink addition to peplink. - Peplink routers are expensive but worth the money - they are very very robust. I would recommend checking out RV Mobile Internet Resource Center - They cover a lot on peplink and also starlink. https://www.rvmobileinternet.com/
- 1 reply
-
- 1
-

-
New StarLink No Connection
StarlinkLeader replied to Mlh39095's topic in Starlink Troubleshooting & Questions
Ensure there is no obstructions. Further instructions from Starlink - Had any errors popup or alerts? I am having issues with initial set up and getting online for the first time If you are having issues setting the hardware up, please refer to our install guide: How do I set up Starlink? If you have followed this guide and are still having issues connecting, then connect to your Starlink WiFi > Open the Starlink App > See if there are any alerts on the home screen. If you are unable to connect to your Starlinlk WiFi, please follow this troubleshooting guide: Cannot connect to the Starlink Router If there are no alerts, please select the following troubleshooting guides based on owhat the App screen says: App Says Starlink is Offline - Disconnected App Says Starlink is Offline - Booting App Says Starlink is Offline - Searching If you have a different question about your account or service, please go back and select a different topic or click the thumbs down icon below to open a support ticket. -
Need to reactivate my account
StarlinkLeader replied to Peter's topic in Starlink Troubleshooting & Questions
Hi @Peter So currently there is no ability to reactivate the account - on the public end. Do you have the ability to submit a new ticket at all? -
Starlink is still developing network aspects and increasing satellite constellation numbers to increase capacity. Give the service sometime. Some users experience a not so ideal service whilst the majority receives 99%-100% service. Hang in there, don't give up - It will be worth the wait 🙂
-
No download speed
StarlinkLeader replied to Richarddelaney22's topic in Starlink Troubleshooting & Questions
Done a factory reset? -
No network connection: Can you connect to the WiFi all ok but no internet? or No connection at all via WiFi/Ethernet? What is your starlink app saying on outages list etc?
-
Below is a comprehensive guide on how to factory reset different generations and models of Starlink user terminals (often called “Dishy” or “Starlink dish”) as well as their accompanying routers/power supplies. Because Starlink hardware has evolved over time, there are a few different reset methods depending on which version of the equipment you have. This article compiles known reset techniques for the most common Starlink kits currently available. Updated: 16/02/2025 Why Perform a Factory Reset? A factory reset completely erases any custom configurations, network names (SSID), and passwords stored on your Starlink system. Common reasons to do a factory reset include: Troubleshooting connection issues – If you’re experiencing persistent drops, throughput problems, or dish connectivity issues, a fresh start can sometimes correct underlying settings or firmware conflicts. Changing ownership – If you’ve sold or transferred your Starlink kit, or you obtained a used system, restoring factory defaults ensures that no personal settings or credentials remain. General performance optimization – After extended use or multiple firmware updates, some users perform periodic resets to maintain a fresh baseline. Important Note: A factory reset will remove all stored configurations. You will need to set up your Starlink from scratch (using the Starlink mobile app or web interface) once the reset completes. Identifying Your Starlink Hardware Before performing a factory reset, it helps to identify which version of Starlink hardware you have. Over time, SpaceX (the parent company of Starlink) has released multiple dish and router designs: Gen 1 (Round Dish / Circular Dishy) Round “Dishy” with a separate router that includes an integrated power supply (often referred to as the “Power Supply Unit”). The router may have a small button labeled “Reset” or “Stow” on the side or bottom. Gen 2 (Rectangular Dish / “Standard” Rectangular Dishy) Rectangular dish with a combined router and power supply “puck” or rectangular router box. The router typically has just a single proprietary cable port for the dish. Newer models may not have any external button. High-Performance Dish or Business Dish A larger, heavier rectangular dish with a slightly different power supply and router design. The core reset method (via the Starlink app or power cycling) is usually the same, although the hardware can look different. Flat High-Performance In-Vehicle Dish (Less common) Specialized hardware intended for in-motion or portable use cases. In most cases, it also follows the same app-based or power-cycling reset instructions. General Reset Options 1. Software (App) Factory Reset For nearly all Starlink hardware versions, the Starlink mobile app offers an option to reset or reboot the dish. If your system is functional enough to reach the dish’s internal settings, this is often the easiest and least error-prone method. Open the Starlink App on your smartphone or tablet. Connect to your Starlink Wi-Fi network. (If you’re already connected and using the Starlink system, you can skip this step.) Tap on the Settings or Account menu (the exact label may vary by app version). Look for “Advanced” or “Advanced Settings.” Select “Factory Reset” or “Reset Starlink” (the name can vary slightly). Confirm your choice. The Starlink app will warn you that this will erase all settings and require you to set up the dish again. Wait for the dish and router to fully reset and reboot. This can take several minutes. Pros: Straightforward, no physical access to the router or dish is required beyond your usual cable connections. Cons: If you have partial connectivity or the Starlink app can’t connect to the dish properly, you might not be able to use this method. 2. Physical Reset Button (Older Gen 1 Router) If you have the original round dish with the Gen 1 router, there may be a physical button labeled “Reset,” “Stow,” or just a small pinhole near the base or side of the router/power supply unit. Power on the Starlink system. Locate the physical reset button. It could be under a small pinhole that requires a paperclip, or it might be a small round button on the router’s casing. Press and hold this button for at least 10-15 seconds. In some documentation, SpaceX recommends up to 30 seconds to ensure a complete factory reset. You may see indicator lights flash or change color (if your version has LED indicators). Release the button once you see a change or after 15-30 seconds. Wait for the dish to fully reboot. This can take several minutes. The dish will typically reorient or “hunt” for satellites again. Tip: Some older user guides reference a “Stow” function on the same button. If you short-press the button, it may stow the dish rather than reset it. Always do a long press if you intend to reset. 3. Power-Cycling Method (Rectangular Dish or High-Performance Dish) Many of the newer rectangular dish setups do not have a dedicated reset button. Instead, they rely on a power-cycling sequence to trigger a factory reset. This procedure involves removing and reconnecting power multiple times in a specific pattern. Starlink’s official documentation has varied over time, but the most commonly referenced procedure is as follows: Power Off the Starlink System Unplug the Starlink router’s power cable from the wall outlet or remove the inline power cable so that the dish loses power. Wait 10 seconds, then Plug the Power Back In. Let the dish power on for about 30-60 seconds (long enough to start booting up). Repeat the Power Off/On Cycle 3-5 Times in Quick Succession. The typical recommended approach is 3 consecutive power cycles, but some official references or user experiences suggest up to 5 cycles might be more reliable for forcing a reset. Aim for about 30 seconds of “on” time each cycle before unplugging it again. This ensures the dish registers each reboot attempt. Observe Dish Behavior. After the final reconnection, the dish should enter a factory reset sequence. You may notice the dish reorient to default position, the router will revert to its default network name (e.g., “STINKY” or “STARLINK”), and any customized Wi-Fi settings will be lost. Wait for Full Reboot. The entire process can take several minutes. The dish will search for satellites and the router will broadcast the default SSID for setup. Important: This method can be somewhat finicky. If it does not work on the first try, unplug the system for a full minute, then try the consecutive power-cycle steps again. The key is the consecutive, relatively quick power cycles that signal a reset to the internal firmware. 4. Reset via “Debug” or Web Interface (Less Common) Some advanced users or beta testers have reported being able to access local debug pages on the Starlink router by navigating to certain local IP addresses (e.g., 192.168.100.1 or a similar range) using a connected computer. However, this approach is not officially supported, and Starlink has locked down many of these debug endpoints in newer firmware updates. Still, if you have an older firmware version: Connect to the Starlink Router via Ethernet or Wi-Fi. Open a web browser and go to http://192.168.100.1/, http://dishy.starlink.com/, or http://starlinkrouter.local/. Look for a Settings or Debug page. If there’s an option for “Factory Reset”, select it and confirm. Note: Many newer Starlink routers no longer expose these settings pages for average users. The Starlink mobile app is the primary, supported interface. After the Reset: Setting Up Your Starlink Again After a successful factory reset, all Starlink routers and dishes revert to their default states. Here’s how to get it back online: Confirm that power is connected and that the dish is physically able to see the sky. On your phone or device, look for the default Starlink Wi-Fi network. It might appear as something like: STINKY + some numbers/letters (older firmware) STARLINK + random characters (newer firmware) Connect to that default SSID. Open the Starlink App. If the app does not automatically detect your new setup, tap “Start Setup” or “Set up Starlink.” Follow the on-screen instructions to: Give your network a new name (SSID). Create a secure Wi-Fi password. Wait for the dish to confirm satellite connectivity and finalize the setup. Once the setup completes, your Starlink system should be fully restored and back to a normal online state, minus any previous custom configurations (port forwarding, firewall rules, etc. if they existed). Additional Tips & Best Practices Perform resets indoors if possible (or ensure you have a stable power environment). You might not want to be repeatedly unplugging cables outside, especially in inclement weather. Inspect cables and connectors. If you are already troubleshooting, use the opportunity to confirm that your Starlink cable is not damaged, that connectors are fully seated, and that there is no debris or moisture. Use a UPS (Uninterruptible Power Supply) if your power is unstable. Frequent brownouts or voltage drops might be perceived by the dish as repeated resets, which can lead to confusion or partial resets. Patience is key during reboots. Starlink can take a few minutes (or more) to orient, run initial firmware checks, and find satellites, especially after a fresh factory reset. Keep the Starlink App updated. Features and reset methods can change as SpaceX refines the product. Always check for the latest version of the Starlink mobile app on iOS or Android. Troubleshooting Reset Failures The power-cycling sequence didn’t work. Double-check that you’re timing the cycles correctly. Give the dish about 30 seconds of power each time before unplugging again. Try increasing the number of cycles from 3 to 5 if necessary. Let the system remain powered off for 1-2 minutes, then try again. The dish reorients but doesn’t broadcast Wi-Fi afterward. Check that your Starlink cable is secure and not damaged. Make sure you’re checking your phone or device for new Wi-Fi networks. The default SSID might not appear as “Starlink,” but as a new name that you haven’t seen before. Physical button reset not responding (Gen 1). Ensure you’re holding the button long enough (15-30 seconds). Some older user guides mention different timing thresholds. Trying multiple durations (10 seconds, 15 seconds, 30 seconds) may help. No lights or indication that anything is happening. Older Starlink routers had small LEDs, but many newer ones have no external lights. Rely on the presence of a Wi-Fi signal or the movement of the dish. If the dish never moves or reboots, verify your power source and wall outlet. Conclusion Resetting a Starlink terminal to factory settings can often resolve issues and clear away old configurations that might be causing performance or connectivity problems. The exact procedure depends on your Starlink kit’s hardware revision: Gen 1 (Round Dish): Use the physical reset button or the app-based reset. Gen 2 (Rectangular Dish) & High-Performance Models: Typically reset via the Starlink app or using the power-cycle sequence (3-5 consecutive power cycles). All Models: If possible, the easiest method is usually through the Starlink mobile app. Once reset, you’ll reconfigure the system with a fresh Wi-Fi name and password. Always keep the Starlink app updated and consult official Starlink documentation (or contact SpaceX/Starlink Support) for the most accurate and recent instructions, as firmware and hardware changes can alter specific reset procedures over time. References & Official Resources Starlink Official Support: Starlink Customer Portal Starlink App: Available on iOS App Store and Google Play Store Community Forums: Reddit’s /r/Starlink, Starlink User Groups on Facebook, etc. (unofficial but helpful user experiences) Disclaimer: The information provided here reflects publicly shared user experiences and official guidance at the time of writing. SpaceX may update Starlink hardware and software, rendering some steps obsolete or slightly different. Always confirm with the latest Starlink documentation or support channels for your specific hardware revision.
-
Performed a factory reset?
-
Dallas Antenna - North Texas Starlink Installer
StarlinkLeader replied to DallasAntenna's topic in Starlink Installers
Pinned & Tagged 🙂 Thanks for posting. -
Hey @Theresa Sorry to hear that its not connecting for you. Lets get you online or at least on the path to getting connected or something sorted at least 🙂 - Perform a factory reset - Let dishy run for a bit don't connect. Just let it sort out a few firmware updates first. Let us know how you get on 🙂 Source: https://support.starlink.com/
-
New install - “No Internet Connection”
StarlinkLeader replied to CGA82's topic in Starlink Troubleshooting & Questions
How long is the cable? and what type of cable did you use? Does dishy move at all? What lights are on the router? -
Have you turned the unit off for 1 hour then turned on? Running any backup/UPS or inverters to power starlink?
-
Dishy acting like a table
StarlinkLeader replied to IslandLife's topic in Starlink Troubleshooting & Questions
I'd recommend leaving it in the assigned home location. - Turn on, leave it for 1 hour. Reboot. - Check if firmware updates have come across. ( internet should work if its updated ) - If still not working. Factory Reset, then wait for 1 hour. It will need to be factory reset in order for it to look at the base communications channels to authenticate and further connect to update. With older firmware it will not connect to sats. -
My starlink researching every 5,10 minutes.
StarlinkLeader replied to agizor's topic in Starlink Troubleshooting & Questions
Moved thread to General Support. -
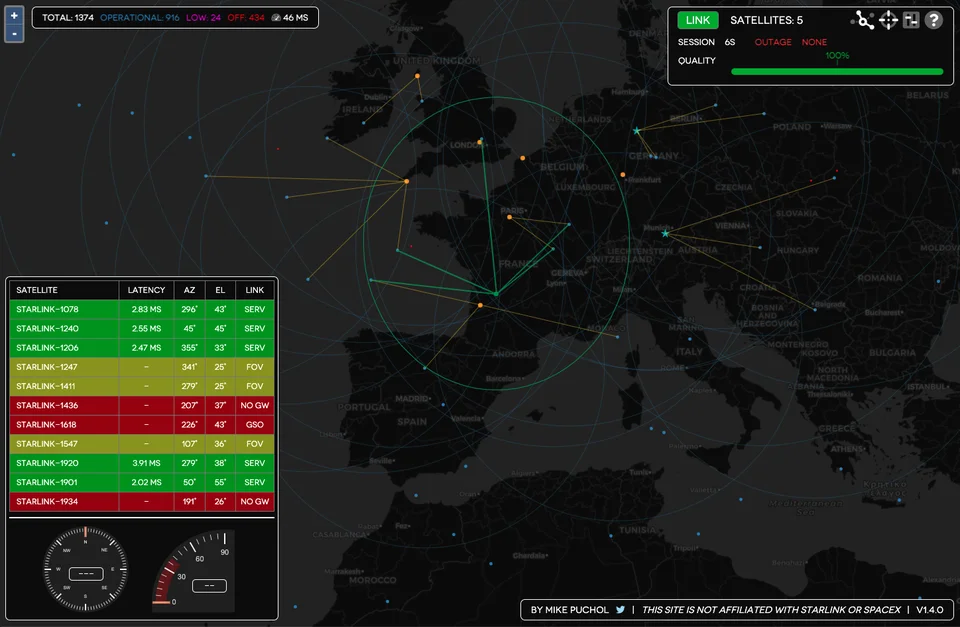
How do I monitor my Starlink satellite coverage? Starlink sx https://www.starlink.sx

-
Transfer Ownership
StarlinkLeader replied to Chupacabra's topic in Starlink Troubleshooting & Questions
Hi @Chupacabra You can transfer Starlink Ownership: Source: https://support.starlink.com/ -
Hi @Aegis What error do you receive upon attempting to login?